Generate for-loop: 100-bit binary Ripple Carry Adder
Question :
Create a 100-bit binary ripple-carry adder by instantiating 100 full adders. The adder adds two 100-bit numbers and a carry-in to produce a 100-bit sum and carry out. To encourage you to actually instantiate full adders, also output the carry-out from each full adder in the ripple-carry adder. cout[99] is the final carry-out from the last full adder, and is the carry-out you usually see.
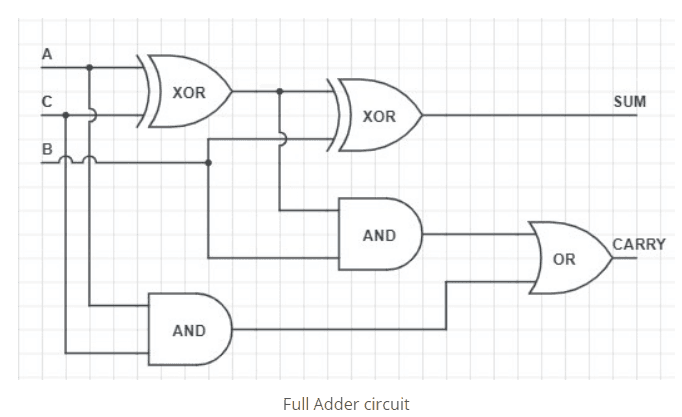
Step 1: Designing a 1-bit Full Adder
Before implementing a 100-bit Ripple Carry Adder, we need to build its fundamental building block: the 1-bit Full Adder. A Full Adder is a combinational circuit that performs binary addition on three inputs:
A → First operand bit
B → Second operand bit
Cin → Carry-in from the previous bit
It produces two outputs:
Sum → Result of bitwise addition
Cout → Carry-out to the next stage
Sum = A⊕B⊕Cin
Cout = (A⋅B)+(B⋅Cin)+(Cin⋅A)
Verilog Code for a 1-bit Full Adder:
Step 2: Using the GENERATE Block to Create a 100-bit Ripple Carry Adder
Now that we have designed a 1-bit Full Adder, the next step is to chain 100 full adders together to create a 100-bit Ripple Carry Adder.
Since manually instantiating 100 full adders would be inefficient, we use a generate-for loop block in Verilog. This allows us to create multiple instances of a module dynamically.
Understanding the generate Block in Verilog
The generate block in Verilog is a powerful construct that allows you to replicate hardware structures based on a loop index.
It is executed at compile time, meaning it generates hardware descriptions before synthesis.
It is useful when multiple instances of a module are required, such as in adders, multipliers, and memory structures.
It works with a special type of variable called
genvar, which is used only insidegenerateblocks.
Step 3 : Verilog Code for 100-bit Ripple Carry Adder Using generate Block
How Verilog Assigns Names to Instances in generate Block
Each module instance inside the generate block gets a unique name based on the block label (Full_Adder_Block) and the loop index (i).
💡 Generated Instance names:
top_module.Full_Adder_Block[1].FA
top_module.Full_Adder_Block[2].FA
top_module.Full_Adder_Block[3].FA
...
top_module.Full_Adder_Block[24].FA → (This is the 25th full adder, i = 24)
...
top_module.Full_Adder_Block[99].FA
Final Takeaway
🚀 Always label your generate blocks using begin : label_name for better hierarchical organization.
🚀 This method ensures proper instance naming for debugging and simulation.
🚀 Helps in large-scale digital designs like adders, multipliers, and pipeline processors.
Practice Exercise:
1️⃣ Write a Testbench:
Instantiate the
top_module.Declare
regandwirevariables for inputs and outputs.Initialize test cases inside an
initialblock.